
Archive: Easy as pie--really! Pie Crust Recipe
 Original Post: Nov. 18, 2007
 I cannot remember when I made my first pie; maybe I was 7 years old? Mom always let my sister and I help in the kitchen and taught us to cook and bake at an early age. The great thing about it was that she did not mind that it looked like a disaster area when we finished. It is a fond memory that I hold in my heart.
Many people are very afraid of making a pie. I think it might be because they don't have a good pie crust recipe to start with. I think Mom's recipe came from the Settlement Cookbook. It is a good, simple, basic recipe. I've never had a flop and never heard a complaint.
Here's the recipe--enough for 2 double crust or 4 single crust pies:
3 cups of all purpose, unbleached white flour -not bread flour
1 teaspoon salt
1 1/3 cups of real, salted butter OR 2/3 cup of real, salted butter and 2/3 cup of lard (yes, lard) I tend to use all butter simply because I always have it on hand. Lard makes a flakier crust.
½ cup of very cold water
The process:
Measure the flour and salt into a large mixing bowl.
With a pastry cutter, cut in 2/3 cup of the butter. (A pastry cutter is an inexpensive gizmo with a handle and multiple semi-circle dull blades--obtainable even from the widget section in the grocery store cooking accessories isle.) Keep cutting, pressing the cutter through the butter into the flour, until the texture is even. The color will be an even creamy tone.
Add the lard or remaining portion of butter and cut in again. This time you want to stop before it is all finely worked in. Stop when the largest chunks are the size of very small peas.
Next, fluff up the butter/lard/flour/salt mixture with a fork. Run the cold water until it is very cold and measure out ½ cup. Drizzle it into the mixture while tossing with a fork until the water is distributed. Here is where you must be careful. DO NOT OVER MIX! Over mixing will develop the gluten in the flour and make your crust tough. Properly done, your dough will probably be somewhat crumbly with some white looking streaks. This is fine.
Most recipes say to chill now. I have never needed to do that, but if your kitchen is very warm, you may want to chill for a half hour. You can also put it in the refrigerator and use it later in the week. I press down the crust dough in the bowl and cover with plastic wrap. You can also freeze it in a plastic bag for future use.
When it is time to roll out the pie crust, get out the pastry canvas and pin sock. These are essential to pie making. You can use a stiff piece of laundered canvas or other tightly woven cotton cloth for the canvas. If you cannot find a pin sock, I have used a leg from a pair of clean pantie hose. Just cut off the leg and slip over the rolling pin. Leave an inch or so extra on each end and cut off the foot. Liberally flour the cloth and the rolling pin. That means you sprinkle on flour and work it into the fabric with your hand.
Cut the pie dough into 4 parts. With your hands, form the quarter section of the dough into a round, flattened disk, patting it into shape. Lay it in the center of the floured canvas. Take the rolling pin and start to gently press it into the center in a cross mark and roll outwards. You are flattening it out a little at a time. Continue rolling it in all directions, keeping its round shape. If it starts sticking to the canvas or pin, put more flour on the fabric. Roll from the center to the edges.
When it is about 1 to 1½ inches bigger than your pie pan all the way around (hold the pan over the crust to estimate) you are ready to put it into the pan. It will be a scant 1/8 inch thick. I roll the crust loosely onto the pin--about half way (here is where the canvas really helps you out; you can lift the cloth up from one side and help maneuver the pastry onto the pin)--and then lift the crust over the pan and lower it into place. Put the outer edge about ¾ - 1 inch over the pie pan edge. Then unroll the remaining crust. Re-center if needed. Ease the crust down to the bottom edges of the pan. If it cracks a little, just squish the edges back together. If you need to put in a patch (a piece of extra rolled out crust from the edge) just wet the area to be patched (use your finger or pastry brush) and put the piece of crust on top. Gently pat into place. No one will ever know!
Now if this is a double crust pie, you repeat the roll out, leave it on the canvas and make the filling. After the filling is in the pie shell, some people brush the edge of the crust in the pie pan with a little water (it acts like glue), but I don't. Once the filling is in the pie shell, repeat the loose roll up of half the pie crust onto the pin and transfer to the pie shell. Start at one edge, leaving that extra margin of crust to hang over the edge and unroll.
For either single or double crust pies, the crimp phase is pretty much the same. First, cut the excess of crust off the pie-I use a butter knife or small paring knife for this. I support the crust with my finger from underneath and cut into it. I leave about ½ inch for double crust and 3/4 inch for single crust pies beyond the pie pan edge. Then start to gently turn and tuck that extra pie dough under all around the pie. Once you have gone around the pie once, go around again and push into place any irregular spots. The idea is to make it an even thickness.
Note that for single crust pies, there is a tendency for the crust to slip into the pie when blind baking (baking the crust with no filling in it--such as for a banana cream pie). To avoid this, make sure you do not stretch the crust to fit the pan. In fact, try to ease a little extra crust down into the pie pan.
Now comes the fun part: the crimp or decorative edge. The simplest method is to just use a fork dipped in flour to prevent sticking and press down gently to make little ridges. My favorite is the peaked crimp. For this one, I first pinch the crust edge into a raised lip all the way around the crust edge. Then using the knuckle of my right forefinger and thumb and forefinger of my left hand, I gently coax the dough into the pinch of my left two fingers with the knuckle of my right. Keeping my fingers lightly floured will keep the dough from sticking.
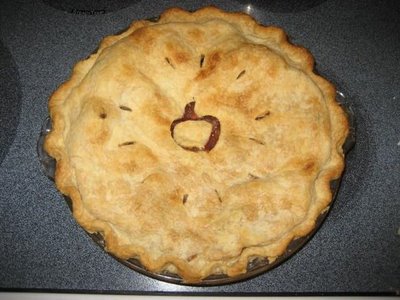
Be sure to cut ample steam vents into that top crust, or your crust will be soggy. This can be simply done, or in an artistic design. Sometimes I write the name of the pie into the crust with little slits or make hole in the center apple shaped, for an apple pie and add some extra crust apple leaves.
For a double crust fruit pie, bake at 450 degrees in a pre-heated oven (very important) for 15 minutes, then turn down to 350 degrees for about 45 minutes. Because I like to really fill up my pies, usually I need to bake longer at 350-at least until I see the filling bubbling inside.
If you are baking a single crust pie, blind (no filling), be sure to *** the crust bottom with a fork before you put it into the pre-heated 450 degree oven. This prevents large bubbles from forming in the crust. These you bake at 450 for 8 to 10 minutes. Check after about 6 min. You don't want it to get too brown. I have as of late started at 450 degrees and then turned down to 425 once the shell is in the oven. This seems to give me a good crust that does not get too brown.
You can make a fancier crust edge by using small cookie cutter shapes of pie dough and gluing onto crust edge with water. Martha Stewart had some very pretty pie edges on page 36 of her November magazine issue.
Sometimes I make some pretty shapes such as a free form Maple leaf or cookie cutter hearts, etc. to place on top of the whipped cream on a pumpkin pie. If you plan on doing this edge, cut more off your crust edge before you turn it under. Otherwise there will be too much crust under the cut outs. For shapes, roll out your crust as usual and cut out the shapes. You will need to flour the cutters to prevent sticking. Place on an un-greased cookie sheet. Bake as you would the single, blind crust, but check after a few minutes. The smaller shapes bake faster. You can also sprinkle these with cinnamon and sugar before baking. Better tell your family these are spoken for though, or they may disappear before you get them on the finished pie!
Glass pie pans are my favorites. They make a much crisper crust. Aluminum would be my second choice. (I won't use that horrid baker's secret tin ware.)
One lady recently told me her grandmother always replaced 1 t. of water with 1 t. cider vinegar per double crust pie. She said it made for a flakier crust. I may just try that trick. Let me know if you ever tried that one
I know many people like to use the Cuisinart for crust. I have one and have used it, but I still prefer to do it by hand. I think you have more control by hand.
For a little extra zip, I have used about 1/4 C lemon juice mixed with enough powdered sugar to make a thin frosting. I then drizzle it over an apple pie. Yum.
PS Dad sometimes would make pies too, so don't think pie making is only for women!
Links: Practically Speaking, Betterbrookfield, RandyMelchert, Jay Weber, Vicki McKenna, The Right View Wisconsin, CNS News, Mark Levin, Breitbart BigGovernment, The Heritage Foundation
Labels: Good food / recipes, Homekeeping
posted by KYLE PRAST | 9:22 AM
![]()
![]()
0 Comments:
Post a Comment
<< Home